Bathroom Lighting Plan
A good lighting plan for the bathroom does more than simply illuminate the space. It prevents shadows near the mirror, makes the shower pleasant to use, and ensures that the bathroom doesn’t feel too bright or jarring in the evening. That’s why a well-designed plan almost always incorporates three layers: general lighting for visibility, task lighting for daily routines, and ambient lighting for relaxation.
The layout of a complete bathroom is key here. The location of the sink, shower, and bathtub, along with the traffic flow and available natural light, determine where lighting is truly needed. Because a bathroom is also a wet area, safety must be an integral part of the design. Zoning, appropriate fixtures, and smart placement of switches are therefore not mere details, but essential components of a well-thought-out plan.
Start with zones: every area of the bathroom needs this
A practical bathroom lighting plan doesn’t start with choosing spotlights or a nice mirror, but with the question of how you use the space. So start by dividing the bathroom into distinct zones: the entryway and walkway, the sink, the shower, and, if applicable, the bathtub. Each area requires different lighting. At the sink, you want to be able to see clearly and precisely, while in the bathtub, you often prefer softer lighting.
The best lighting is also created in layers. General lighting provides an overview as soon as you walk in, task lighting helps with shaving, applying makeup, or putting in contact lenses, and softer lighting makes the space more pleasant in the evening. So start by considering the layout, natural light, and how the space will be used. Only then should you choose fixtures, light sources, and lighting controls. This way, you’ll avoid a bathroom that looks beautiful but turns out to be impractical or too bright in everyday use.
Basic lighting that illuminates the entire space
General lighting is the layer that makes the entire bathroom functional. It provides clarity, helps prevent dark corners, and serves as the backdrop against which all other lighting builds. This light often comes from the ceiling—for example, via spotlights or a ceiling fixture—but the correct position always depends on the ceiling height, the size of the room, and the layout below. If you want to install recessed spotlights or continuous light strips, lowering the bathroom ceiling can be the solution.
In a compact bathroom, every light source stands out more. That’s precisely why even, soft lighting is more important than lots of individual accent lights. Good general lighting feels spacious and balanced, without harsh contrasts between light and dark areas.
Mirror and sink lighting without shadows
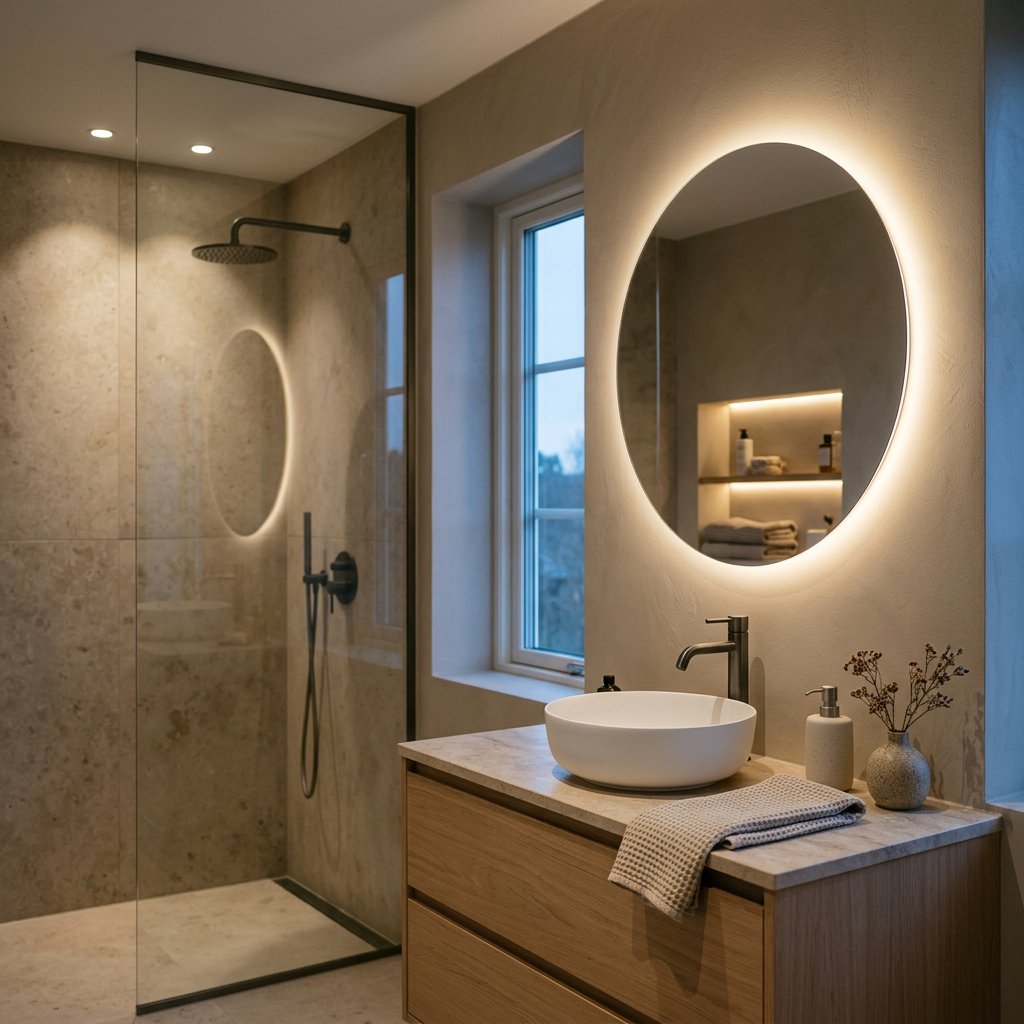
A single spot light directly above the sink seems logical, but it often casts shadows on your face. That’s inconvenient when shaving, applying makeup, or putting in contact lenses. A light next to the mirror—or a mirror with lighting around the edges or from behind—distributes the light much more evenly.
For this area, choose bright lighting that feels natural without being too cold. In practice, neutral white or warm neutral often works better than very cool light. This way, you can see what you’re doing clearly, while the bathroom still maintains a calm and comfortable atmosphere.
Mood lighting for the bath, shower, and evening use
Not every moment in the bathroom calls for bright task lighting. In the evening, during a relaxing shower, or when you’re taking a bath, softer lighting feels much more pleasant. Ambient lighting makes the bathroom feel warmer, calmer, and more luxurious, without compromising on functionality during the day.
You can create ambiance in various ways: with dimmers, with indirect lighting behind a mirror or piece of furniture, or with a subtle accent in a niche or by the bathtub. Even in a walk-in shower, a modest, well-placed light fixture can make the space feel more inviting, as long as the fixture is suitable for that location.
It’s important, however, that ambient lighting can be switched on and off separately from the functional lighting. That way, you don’t have to automatically turn on all the ceiling spotlights in the evening; instead, you can choose exactly the brightness that suits the moment.
How to Create a Bathroom Lighting Plan, Step by Step
- Start with a simple floor plan. Be sure to include at least the door, window, shower, bathtub, sink, mirror, and built-in furniture or niches. Without that foundation, you’ll quickly end up choosing light fixtures that later turn out to be poorly placed.
- Next, decide exactly what you’ll be doing in each area. You’ll need different lighting by the sink than along the walkway or by the bathtub. Also consider different times of the day: rushing in the morning calls for different lighting than relaxing in the evening. Good planning for a bathroom remodel helps you make those decisions early on.
- Next, start by selecting the lighting layers and then choose the fixtures. For each area, ask yourself whether you need general lighting, task lighting, mood lighting, or a combination. This way, you’ll create a bathroom lighting plan based on usage, not on individual products.
- Make the most of the available natural light. A window, skylight, or light-colored wall finish can make a big difference during the day, while dark materials actually require more artificial light. Glossy surfaces, glass, and a large mirror also reflect existing light further into the room.
- Only then should you consider the technical details: spotlights, wall sconces, mirror lights, switches, and any dimmers. Keep in mind sight lines, ceiling height, existing electrical wiring, and whether you want to control the lighting separately by zone.
- It’s best to decide this early on in the bathroom renovation. That way, you can coordinate the ceiling, mirror, niche, wall finishes, and electrical outlets effectively. At Refresh Bathrooms, this coordination is ideally incorporated into the design from the start, so that the bathroom not only looks beautiful but is also lit in a logical way.
Placing spotlights strategically to avoid dark corners
- Place the spotlights according to the layout, not just based on the ceiling. The light should be directed where you actually use the bathroom: along the walkway, in front of the shower, around the sink, and in any dark corners that might form.
- Use practical rules of thumb only as a starting point. The final effect depends heavily on the ceiling height, the beam angle of the spotlight, and the width of the room. What looks spacious in one bathroom may actually create a cluttered look in another.
- Recessed spotlights make sense if your ceiling is suitable for them and you want a sleek, understated look. If you have limited ceiling space or want to minimize demolition work, surface-mounted spotlights or wall sconces may be more practical. A stretch ceiling in the bathroom also makes it easier to neatly conceal spotlights and wiring.
- Don't rely solely on spotlights near the mirror. Light coming only from above creates shadows more easily and can be blinding. Therefore, combine spotlights with directed light next to, behind, or inside the mirror itself.
- Well-placed spotlights can also illuminate walls. This often makes a bathroom feel more serene and appear larger, especially when you use light-colored or reflective finishes.
Safety First: Pay Attention to Zones, IP Ratings, and Switches
Beautiful lighting in the bathroom only works well if it’s also safe. Therefore, always pay attention to wet areas and choose fixtures and connections that are suitable for where they’ll be installed. Read more about electrical systems and safety zones in the bathroom, and which IP ratings are recommended for each zone.
| Component | What should you look out for? | Practical Advice |
|---|---|---|
| Wet Areas | The risk of direct contact with water is highest around the shower and bathtub. | Divide the space into zones before choosing your light fixtures. |
| IP values | Not every light fixture is resistant to moisture or splashes. | For each zone, choose only products suitable for use in bathrooms and follow the product specifications. |
| Low Voltage | When you're near water, extra protection can be important. | Assess on a case-by-case basis whether low voltage is desirable or necessary. |
| Switches and Transformers | Controls and technical components must also be kept dry and arranged in a logical manner. | Install switches away from the wettest areas and keep drivers or transformers within easy reach. |
| Installation | Proper installation is just as important as choosing the right product. | Have a professional inspect the installation as needed. |
How to Make a Dark or Small Bathroom Brighter
- First, see if you can bring in more natural light. A skylight or dome window can dramatically transform a dark bathroom, because natural light makes the space feel much more open and airy during the day than artificial light alone.
- Next, use materials that help diffuse light. A large mirror, glass, and light-colored or slightly glossy finishes reflect the available light deeper into the room. This means you won’t have to rely as heavily on bright lighting to compensate.
- Also consider the layout. In a small bathroom, heavy visual breaks can make the space feel darker and more cramped. An open layout with a glass shower enclosure creates a more airy feel than a closed or solid partition.
- Use walls and ceilings to your advantage. When lighting also illuminates a wall, the space often appears wider. This effect is particularly noticeable in compact bathrooms, where every dark surface can make the room seem smaller than it actually is.
- Combine architectural choices and lighting in a single plan. Simply adding extra spotlights doesn’t always solve the problem of a dim bathroom if the mirror, shower wall, colors, and sightlines continue to block the light.
- It’s precisely when you’re renovating anyway that this cohesiveness pays off the most. By considering the lighting plan, layout, and finishes all at once—for example, during a consultation—you can also better coordinate niches, mirror sizes, and wall finishes. That’s often the moment when a small bathroom can start to feel surprisingly spacious and bright.
A sample lighting plan for a compact bathroom
In a compact bathroom, three well-chosen layers of lighting and two separate light switches are often all you need. This keeps the space calm, yet functional at any time of day.
| Zone | Lighting | Circuit | Better to avoid |
|---|---|---|---|
| Common Area | Even ambient lighting from ceiling spotlights or a compact ceiling light | Switch 1 for daily use | All light fixtures in a single, clean line, regardless of the layout |
| Sink and mirror | Directional light next to or behind the mirror | Switch 2, possibly combined with a dimmer | A single bright spotlight directly above the face |
| Niche, cabinet, or shower area | Subtle ambient lighting for depth and atmosphere | Non-dimmable or dimmable for evening use | Too many scattered accents that make the small space feel cluttered |
| Time of Use | Bright and functional during the day, softer and dimmer in the evening | Separate controls allow for quick changes | Always having to turn everything on at the same time |